Improved Uni Knot: A Comprehensive Guide for Anglers
Are you an angler looking to enhance your fishing experience? If so, you might want to consider mastering the improved uni knot. This versatile and strong knot is a favorite among anglers for its reliability and ease of use. In this detailed guide, we will explore the ins and outs of the improved uni knot, covering its history, benefits, step-by-step instructions, and tips for perfecting your technique.
History of the Improved Uni Knot
The improved uni knot, also known as the uni knot or fisherman’s knot, has a long-standing history in the world of fishing. It was developed in the early 20th century and has since become a staple in the tackle box of many anglers. The knot’s popularity can be attributed to its simplicity, strength, and ability to handle a wide range of fishing lines.
Benefits of the Improved Uni Knot
There are several reasons why the improved uni knot is a top choice for anglers:
-
Strength: The improved uni knot is known for its exceptional strength, making it suitable for a variety of fishing scenarios.
-
Reliability: This knot is highly reliable, even when subjected to heavy loads.
-
Easy to Tie: The improved uni knot is straightforward to tie, making it accessible for anglers of all skill levels.
-
Works with Different Lines: The knot is compatible with a wide range of fishing lines, including monofilament, fluorocarbon, and braided lines.
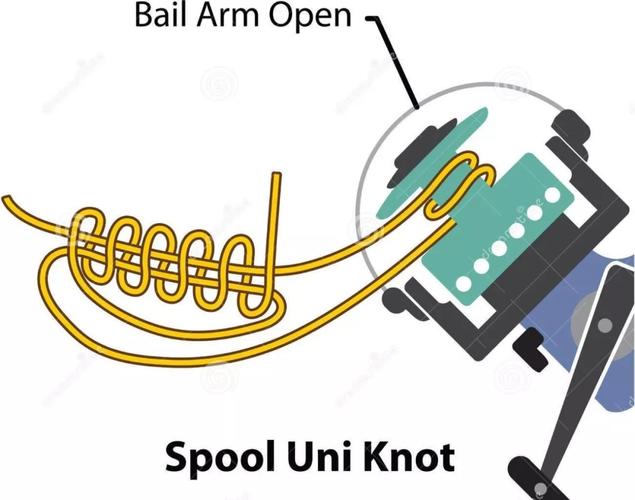
Step-by-Step Instructions for Tying the Improved Uni Knot
Now that you understand the benefits of the improved uni knot, let’s dive into the step-by-step instructions for tying it:
-
Start by making a loop in your fishing line, leaving a tag end about 6 inches long.
-
Pass the tag end through the loop, creating a second loop.
-
Take the tag end and pass it through the second loop, creating a third loop.
-
Pass the tag end through the first loop, creating a fourth loop.
-
Pass the tag end through the third loop, creating a fifth loop.
-
Pass the tag end through the fourth loop, creating a sixth loop.
-
Pass the tag end through the fifth loop, creating a seventh loop.
-
Pass the tag end through the sixth loop, creating an eighth loop.
-
Pass the tag end through the seventh loop, creating a ninth loop.
-
Pass the tag end through the eighth loop, creating a tenth loop.
-
Pass the tag end through the ninth loop, creating an eleventh loop.
-
Pass the tag end through the tenth loop, creating a twelfth loop.
-
Pass the tag end through the eleventh loop, creating a thirteenth loop.
-
Pass the tag end through the twelfth loop, creating a fourteenth loop.
-
Pass the tag end through the thirteenth loop, creating a fifteenth loop.
-
Pass the tag end through the fourteenth loop, creating a sixteenth loop.
-
Pass the tag end through the fifteenth loop, creating a seventeenth loop.
-
Pass the tag end through the sixteenth loop, creating an eighteenth loop.
-
Pass the tag end through the seventeenth loop, creating a nineteenth loop.
-
Pass the tag end through the eighteenth loop, creating a twentieth loop.
-
Pass the tag end through the nineteenth loop, creating a twenty-first loop.
-
Pass the tag end through the twentieth loop, creating a twenty-second loop.
-
Pass the tag end through the twenty-first loop, creating a twenty-third loop.
-
Pass the tag end through the twenty-second loop, creating a twenty