
Understanding the Uni Knot to Spool Process
Have you ever wondered about the intricate process of converting a simple uni knot into a functional spool? This transformation is not just a craft but a blend of tradition, skill, and artistry. In this article, we delve into the details of this fascinating process, exploring its history, techniques, and the tools required.
History of the Uni Knot to Spool Process
The uni knot to spool process has its roots in ancient times, where it was primarily used for fishing and other practical applications. Over centuries, the technique has evolved, gaining popularity among artisans and hobbyists alike. Today, it is a cherished craft that combines utility with aesthetic appeal.

Tools and Materials Needed
Before diving into the process, it’s essential to gather the necessary tools and materials. Here’s a list of what you’ll need:
| Tool/Item | Description |
|---|---|
| Uni Knot | A simple overhand knot, which serves as the base for the spool. |
| Thread | High-quality thread, such as nylon or cotton, is ideal for durability and flexibility. |
| Spool | A wooden or plastic rod that will hold the thread. |
| Scissors | Sharp scissors for cutting the thread. |
| Needle | A small, sharp needle for threading the thread through the uni knot. |
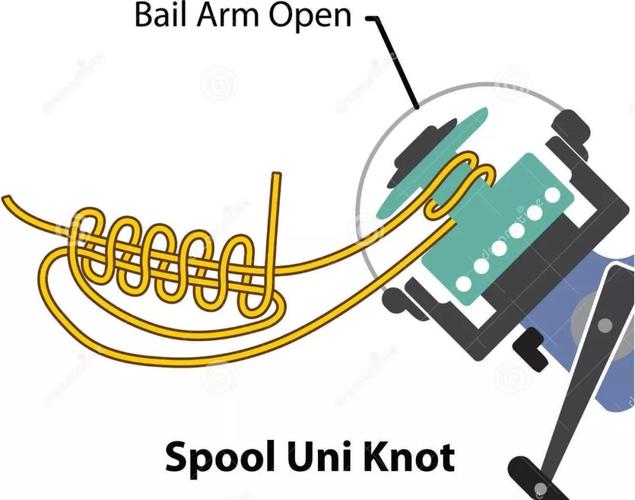
The Step-by-Step Process
Now that you have all the necessary tools and materials, let’s explore the step-by-step process of converting a uni knot into a spool:
-
Start by creating a uni knot. This is a simple overhand knot, which you can learn to tie by following various online tutorials.
-
Once you have the uni knot, thread the needle through the loop of the knot. This will help you guide the thread through the knot and create the spool.
-
Attach the needle to the thread and begin threading it through the uni knot. Start from the bottom of the knot and work your way up, ensuring that the thread is tight and secure.
-
Once you have threaded the entire uni knot, tie a knot at the end of the thread to prevent it from unraveling.
-
Attach the thread to the spool by threading it through the hole in the center of the spool. Make sure the thread is tight and secure.
-
Trim any excess thread and enjoy your newly created spool.
Advantages of the Uni Knot to Spool Process
The uni knot to spool process offers several advantages:
-
It is a cost-effective way to create your own spools, saving you money on store-bought options.
-
It allows for customization, as you can choose the type of thread and the size of the spool to suit your needs.
-
It is a rewarding and satisfying craft that can be enjoyed by people of all ages.
Conclusion
Converting a uni knot into a spool is a skill that combines tradition with modern utility. By following the step-by-step process and using the right tools and materials, you can create your own spools that are both functional and beautiful. So, why not give it a try and experience the joy of crafting your own uni knot to spool?